When it comes to woodworking joinery, dovetail joints are often the gold standard for strength, aesthetics, and durability. But are dovetails always the right choice? Not necessarily especially when working with plywood or when you’re limited on tools or time.

In this blog post, we’ll explore a practical and beginner-friendly alternative: the box joint. You’ll learn what it is, why it works so well, and how to make it with common tools. Let’s dive in!
Looking for more woodworking ideas? Explore: The World’s Largest Collection of 16,000 Woodworking Plans.
Why Dovetails Aren’t Always Ideal
Dovetail joints are great for solid hardwoods, but they come with challenges:
- Plywood Delamination: The angled cuts of dovetails can weaken plywood layers, especially during dry fits or under pressure.
- Tool Requirements: Cutting dovetails typically requires a router, dovetail jig, or a lot of hand-tool precision—something not everyone has.
- Time-Consuming: Hand-cutting dovetails is rewarding, but not always practical for quick or high-volume builds.
So what’s the solution?
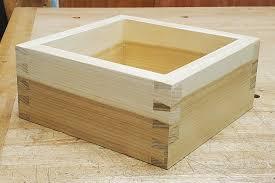
Introducing the Box Joint (Finger Joint)
A box joint—also known as a finger joint—is a square-toothed joint that interlocks two pieces of wood at a right angle. While not as decorative as dovetails, box joints offer excellent strength, simplicity, and clean lines.
Benefits of Box Joints:
- Easier to cut with basic tools
- Great for plywood and hardwood
- Strong, glue-friendly surface area
- Ideal for drawers, boxes, and cabinet work
How to Make a Box Joint
Option 1: Cut by Hand
Using a dovetail saw and chisel, you can cut box joints manually. Just ensure the finger width divides evenly across the width of your board (e.g., 6-inch board → 1/2-inch fingers = 12 total).
Option 2: Use a Dovetail Jig
Many dovetail jigs can be used to cut box joints. Swap in a straight-cut router bit, and follow your jig’s instructions as if cutting dovetail tails.
Option 3: Table Saw + Box Joint Jig (Best Option)
This is the most accurate and efficient method, especially with a stacked dado blade.
Step-by-Step:
- Set dado width to match your desired finger width.
- Attach a scrap board to your miter gauge—extending at least 2″ past the blade.
- Cut a notch, then move the scrap board twice the finger width and reattach.
- Insert a key block (same width as fingers) into the notch—it becomes your cutting guide.
- Place the board vertically against the key and make your first cut.
- Shift the workpiece, fitting each new notch over the key to guide your cuts.
- Repeat until all fingers are cut.
- For the matching board, offset the first cut so the fingers interlock properly.
Assembly Tips for Box Joints
- Dry fit the pieces first—if your jig is accurate, they should fit perfectly.
- Apply wood glue to all joint surfaces.
- Clamp carefully to keep the box square—unlike dovetails, box joints don’t self-align.
Box Joint vs Dovetail: Which Should You Choose
| Feature | Dovetail Joint | Box Joint |
|---|---|---|
| Strength | Very Strong | Strong |
| Tools Needed | Dovetail jig, router | Table saw + jig |
| Looks | Decorative | Clean, simple |
| Best For | Solid wood | Plywood or softwood |
| Skill Level | Intermediate to Expert | Beginner to Intermediate |
| Build Time | Longer | Faster |
If you’re working with plywood, have limited tools, or want a quick, strong joint, the box joint is the perfect choice.
Final Thoughts
Whether you’re building a set of drawers or crafting a custom cabinet, mastering the box joint is a must-have skill in your woodworking journey. It’s simple, reliable, and versatile enough for beginners and pros alike.
Want More Projects Like This?
Don’t miss out on the World’s Largest Collection of 16,000 Woodworking Plans. Whether you’re building furniture, toys, cabinets, or sheds — you’ll find step-by-step blueprints, materials lists, and project ideas for every skill level.