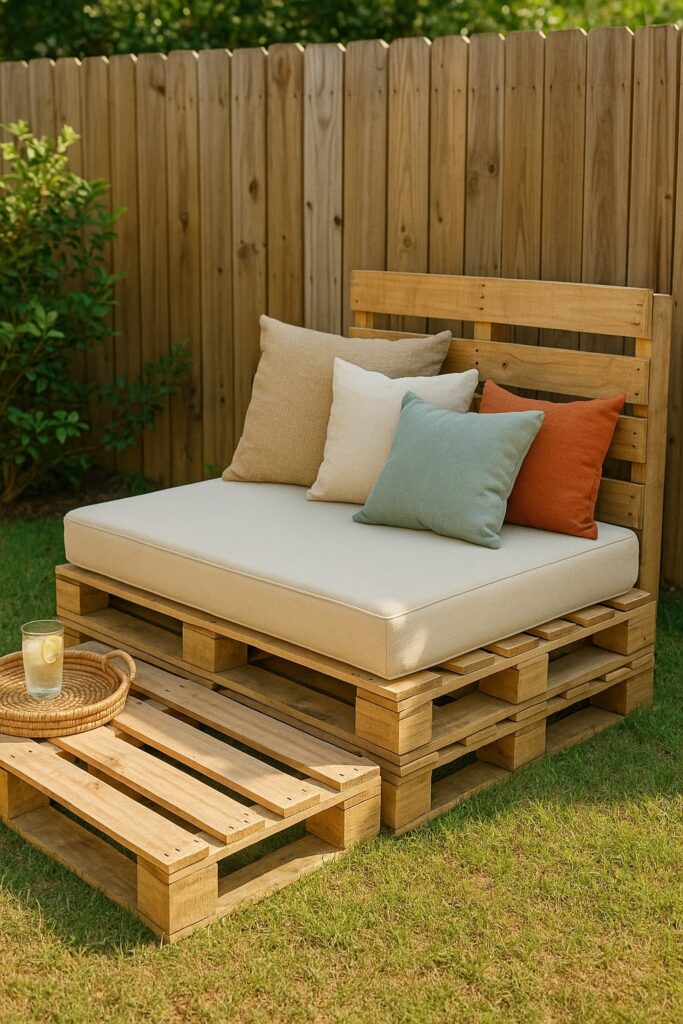
Picture this: a warm breeze rustles the leaves, your favorite drink sweats on the side table, and you’re sunk deep into a cloud-soft mattress on a rustic wooden daybed—crafted entirely with your own hands from humble wooden pallets. Sound like a dream? With a little creativity and some weekend effort, that dream can become your new backyard reality.
Whether you’re a weekend warrior or a DIY novice, building a pallet daybed is a project that blends style, sustainability, and serious relaxation. It’s not just outdoor furniture—it’s your personal sanctuary under the open sky.
Why a Pallet Daybed Is the Backyard Upgrade You Need
Wood pallets aren’t just shipping cast-offs—they’re DIY gold. Repurposing them means you’re saving money, reducing waste, and creating something truly one-of-a-kind. Here’s why this is a must-do project:
- Budget-Friendly: Often free or super cheap.
- Eco-Savvy: Upcycling at its finest.
- Totally Custom: Paint it. Stain it. Boho it out.
- Built for Chill: Perfect for naps, books, or stargazing.
What You’ll Need Before You Begin
This project doesn’t require a fancy workshop—just a few essential tools and materials:
Tools:
- Power drill & bits
- Sander or 120-grit paper
- Saw (hand, jigsaw, or circular)
- Measuring tape, hammer, screwdriver
Materials:
- 4–6 standard wooden pallets (look for “HT” stamped)
- Wood screws (2–3”)
- Optional: L-brackets, caster wheels, ropes
- Outdoor wood sealant or paint
- Twin mattress or foam pad
- Outdoor cushions & weather-resistant fabric
Safety First: Don’t forget gloves, goggles, and a dust mask!
For precise plans and more pallet project ideas, check out Ted’s Woodworking Plans—it’s packed with over 16,000 designs to inspire your next build.
Step-by-Step: How to Build a DIY Pallet Daybed
1. Source & Prep the Pallets
The journey begins with treasure hunting for pallets. Find them at warehouses, supermarkets, or construction sites. Pick ones that are solid, free of cracks, and heat-treated (HT).
- Clean & Dry them well.
- Sand smooth to avoid splinters.
- Inspect for nails and damage before moving forward.
2. Sketch Your Design
Plan out your masterpiece. A classic twin mattress (38”x75”) fits well on four pallets arranged 2×2.
Optional Features:
- Backrest
- Armrests
- Hanging setup (if you’re daring)
- Canopy with lights
Sketch your design or use a blueprint from Ted’s Woodworking Plans for precision.
3. Build the Base
Time to get your hands dirty.
- Place 4 pallets in a 2×2 grid.
- Drill them together using long wood screws.
- Use L-brackets for extra stability.
- Want more height? Stack a second layer of pallets!
4. Add a Backrest
Create that cozy lounge vibe with a pallet or two standing upright.
- Lean it back slightly (10–15°) for comfort.
- Secure it tightly to the base with screws.
- Add diagonal braces for support.
5. Upgrade It Your Way
Go beyond basic:
- Add Wheels for easy movement.
- Create Armrests using leftover pallet sections.
- Install a Bottom Shelf for blankets or books.
- Suspend It! With rope and a strong overhead beam.
6. Sand & Seal for the Outdoors
Smooth every surface—especially contact points.
- Clean off the dust.
- Apply 2–3 coats of weatherproof sealant or outdoor paint.
- Let each coat dry completely.
Choose a Look:
- Rustic? Use dark stain.
- Modern? Paint it matte white or black.
- Boho? Try pastel hues with mixed fabrics.
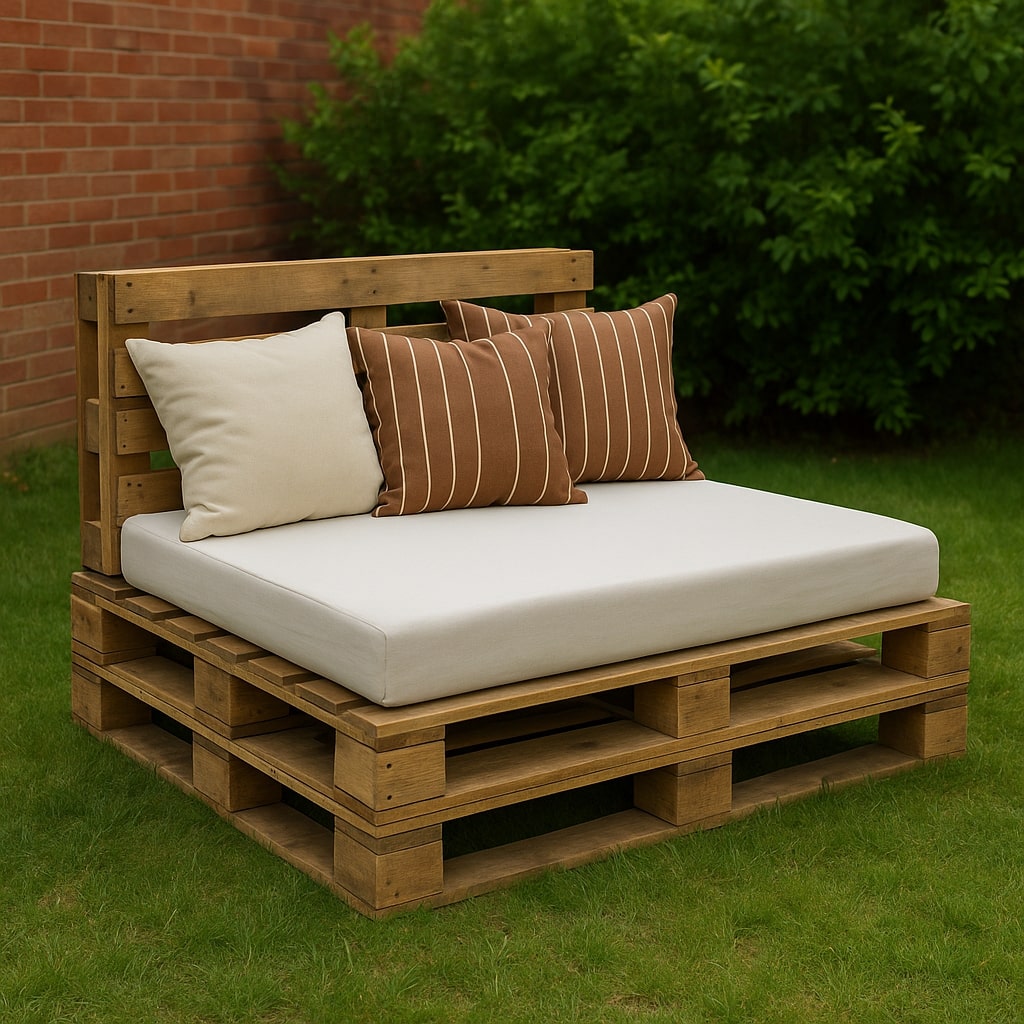
7. Add Cushions and Get Comfy
Top your creation with a twin mattress or thick foam pad.
- Use weatherproof covers like Sunbrella.
- Add oversized back cushions and a few colorful pillows.
- Secure the mattress with Velcro or ties if needed.
Custom Styling Tips
Here’s how to personalize your backyard retreat:
- Boho Oasis: Drape fabric, add tassels and lanterns.
- Rustic Farmhouse: Go natural with plaid accents.
- Modern Minimalist: Stick to grays, whites, and straight lines.
- Tropical Paradise: Add palms, lights, and bright colors.
Keep It Protected
To make it last:
- Apply marine-grade sealant annually.
- Keep it off wet ground using feet or blocks.
- Use a waterproof cover during storms.
| Item | Estimated Cost |
|---|---|
| Pallets | Free–$20 |
| Screws & Brackets | $10 |
| Sealant or Paint | $15–$30 |
| Mattress & Cushions | $50–$100 |
| Total | $75–$160 |
Build Time: 8–12 hours over a weekend
Potential Sell Price: $150–$300 if flipping for profit

Need a detailed blueprint or more pallet ideas? Ted’s Woodworking Plans offers thousands of designs, including outdoor furniture, to guide your build with precision and flair. It’s a game-changer for DIYers looking to level up.
Solve These Common Issues
- Wobbly Frame: Add more screws or support underneath.
- Splinters: More sanding. Always.
- Warped Wood: Only use dry, flat pallets.
- Faded Color: Re-coat with UV-protectant sealant each year.
Where to Show Off Your Daybed
Your hard work deserves an audience:
- Pinterest: Share as a weekend project idea.
- Instagram: Post a styled shot under #PalletDaybed.
- Etsy: Sell custom creations!
- BBQ Nights: Invite friends and soak in compliments.
Final Words
Creating a DIY pallet daybed is about more than just nailing boards together. It’s crafting a personal escape, a space for peace, comfort, and style. Whether you’re sipping lemonade or stargazing with a friend, this handmade retreat will always be your backyard’s crown jewel.
Ready to build yours? Grab some pallets and start your oasis now.
For more step-by-step plans and woodworking inspiration, explore Ted’s Woodworking Plans—it’s your ticket to mastering projects like this and beyond. Grab your pallets and start building your backyard retreat today!