Looking to craft a timeless outdoor chair that combines comfort, style, and durability? This DIY Adirondack Chair Project is the perfect weekend build for any woodworking enthusiast. With its slanted back, wide armrests, and rustic charm, it’s a must-have for your garden, patio, or porch.

Project Overview
Project Name: Adirondack Chair
Skill Level: Beginner to Intermediate
Build Time: 4–6 hours
Tools Needed: Saw, Drill, Sander, Screws, Wood Glue
Best For: Outdoor seating, patio furniture, relaxation spot
Part List
Here are all the wooden parts you’ll need for your Adirondack Chair:
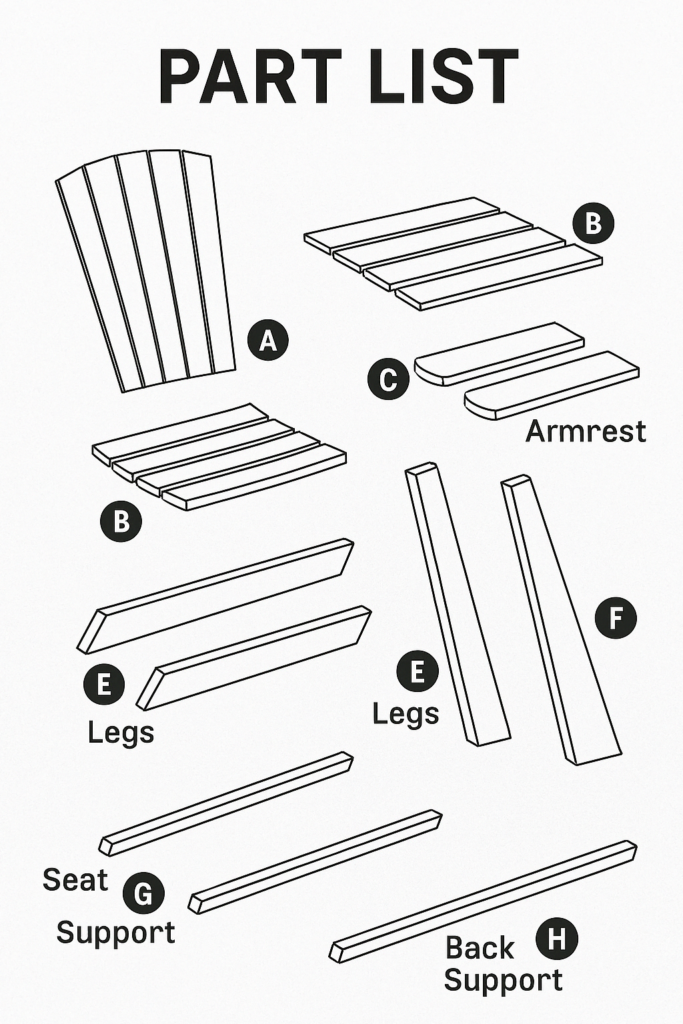
| Part Name | Label | Description |
|---|---|---|
| Back Slats | A | 4–5 vertical slats forming the chair backrest |
| Seat Slats | B | 3–5 horizontal slats making up the seat surface |
| Armrests | C | Flat side supports for your arms |
| Front Legs | D | Shorter angled pieces supporting the front |
| Rear Legs | E | Longer angled back legs for lean support |
| Side Supports | F | Diagonal rails joining front and rear legs |
| Seat Supports | G | Horizontal braces supporting the seat slats |
| Back Support | H | Beam connecting the two sides behind the seat |
| Screws/Bolts | — | Fasteners (pilot holes recommended) |
Pro Tip: Use hardwood like teak, cedar, or treated pine for better outdoor resistance.
Step-by-Step Instructions
Step 1: Cut the Pieces
Cut all parts according to your plan. Use sandpaper or a sander to smooth out edges. Accuracy is key for balance and comfort.
Step 2: Assemble the Sides
Attach front and rear legs to seat supports to form two symmetrical side frames. Ensure the rear legs are angled slightly for that iconic laid-back look.
Step 3: Attach the Seat Slats
Lay the frame on its side and install the seat slats evenly, using wood glue and screws. Space them out for ventilation and rain drainage.
Step 4: Install the Back Slats
Screw the back slats onto the back support rail, then secure the assembly to the rear legs. Maintain even spacing and symmetry.
Step 5: Add the Armrests
Position the armrests flush on top of the legs and fasten them securely. For added support, you can reinforce with angled brackets or wood blocks.
Step 6: Sand and Finish
Give your chair a final smooth sanding. Then apply your favorite wood stain, paint, or a waterproof outdoor sealer.
Want More Projects Like This?
Don’t miss out on the World’s Largest Collection of 16,000 Woodworking Plans. Whether you’re building furniture, toys, cabinets, or sheds — you’ll find step-by-step blueprints, materials lists, and project ideas for every skill level.